Chicken Tracking Setup
The Setup Process should be done at night or early morning and takes 30 minutes. You will need an iPad, our Bluetooth Printer, your allocation worksheet #s and the Quantities for each chicken type in the freezer, thaw & holding areas of your store. New stores will only need freezer quantitiesTo Get Started follow the Steps Below:
STEP 1: On the iPad, Download our IOS App or Android App and login with your email/password created from your welcome email.
STEP 2: On the Breading iPad enable bluetooth and login into the Probiz App then go to App menu>Chicken Tracker>Startup wizard here.
STEP 3: Turn on the printer and set it no more than 35 feet from the Breading iPad where labels are easily accessible for your team.
STEP 4: Go to the Tracker wizard here then tap Scan for Printer and select “Tracker” from the popup. Be sure your popup blocker is off.
STEP 5: Choose your Store option >Start here to begin entering the quantity for each chicken type you have in your store. As you complete each section, labels will print for you to place on the Boxes or trays. Use reprint all to reprint for any reason. The Final Step is to enter your allocation worksheet numbers provided by corporate. We do this to keep your store lean. Allocations settings can be adjusted from the settings icon on the main tracker screen or here.

Step 6:Start using Tracker by mounting your iPad above the Breader and set the iPad to the Tracker Page here. When the Breader finishes the in-use case they tap done button which pulls the oldest case of chicken from the thaw cabinet to the breading table changing the in-use number. Labels print filling holes it creates from thaw back to the freezer. Once they print, the team places the labels in the upper front area of the trays and moves the chicken according to the label info…. ie… # 23 freezer to thaw, # 24 thaw to holding.IMPORTANT: Train your team when they see printed labels to move that chicken immediately!

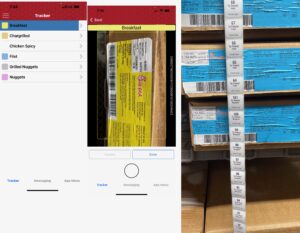
Step 7: Daily Chicken Check-in – Open the mobile app, tap the tracker tab, choose a chicken type and take barcode pictures of each case until complete. Be sure to place the green line over the barcode so the system can parse the barcode data where it will show on the far right when parsed. (See Check-in video). Once you have checked in all the chicken hit print and the bluetooth printer will print out the labels for you to place on the boxes.

Tracker Common Questions Answered via Video Library
Daily Check-in | Fixing Tracker | Kiosk Mode | Printer Calibration | Special Orders/Catering | Reprinting labels
– Fixing Errors: If chicken is moved without the tracker, tap Fix on the tracker screen and drag the case to the correct location.
– Kiosk Mode: Locks the iPad to a specific screen. Use a PIN to unlock.
– Reprinting Labels: Go to App Menu > Chicken Tracker > Reprint Labels to reprint single or group labels.
– Special Orders & Catering: Create orders (e.g., “400 sandwiches”) with automatic inventory adjustments.